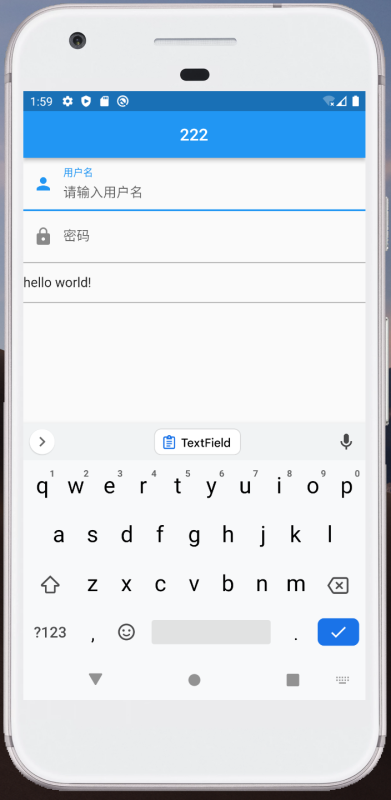
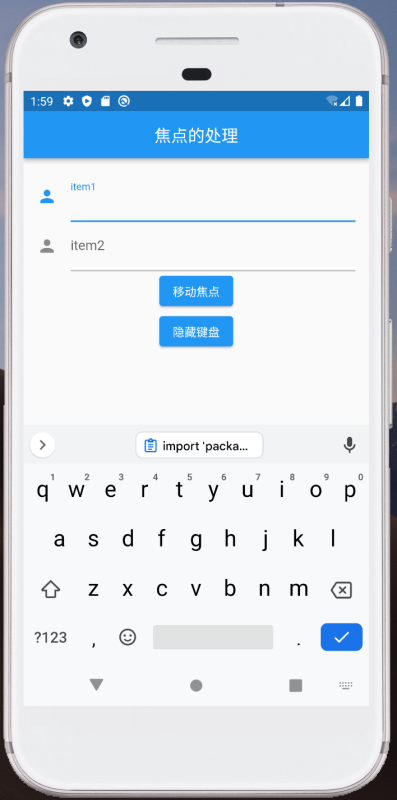
效果图:

1、获取文本
<code>import 'package:flutter/material.dart';
main(){
runApp(const MyApp());
}
class MyApp extends StatelessWidget {
const MyApp({Key? key}) : super(key: key);
@override
Widget build(BuildContext context) {
return MaterialApp(
debugShowCheckedModeBanner: false,
home: Scaffold(
appBar: AppBar(
title: const Text("222"),
centerTitle: true,
),
body: const MyHomePage(),
),
);
}
}
class MyHomePage extends StatefulWidget {
const MyHomePage({Key? key}) : super(key: key);
@override
State<MyHomePage> createState() => _MyHomePageState();
}
class _MyHomePageState extends State<MyHomePage> {
final TextEditingController _unameController = TextEditingController();
final TextEditingController _pwdController = TextEditingController();
String? username;
String? password;
final TextEditingController _selectionController = TextEditingController();
@override
void initState() {
super.initState();
//获取用户名文本
_unameController.addListener(() {
debugPrint("addListener_unameController:---${_unameController.text}");
});
//获取密码文本
_pwdController.addListener(() {
//_pwdController.text = "666";
debugPrint("addListener_pwdController:---${_pwdController.text}");
});
//设置默认值,并从第三个字符开始选中后面的字符
_selectionController.text="hello world!";
_selectionController.selection=TextSelection(
baseOffset: 2,
extentOffset: _selectionController.text.length
);
}
@override
Widget build(BuildContext context) {
return Column(
children: [
TextField(
autofocus: true,
decoration: const InputDecoration(
prefixIcon: Icon(Icons.person),
labelText: "用户名",
hintText: "请输入用户名"
),
controller: _unameController,
/* onChanged: (value){
debugPrint("onChanged:username---$value");
},*/
),
TextField(
decoration:const InputDecoration(
prefixIcon: Icon(Icons.lock),
labelText: "密码",
hintText: "请输入密码"
),
obscureText: true,
controller: _pwdController,
/* onChanged: (value){
debugPrint("onChanged:password---$value");
},*/
),
TextField(
controller: _selectionController,
)
],
);
}
}</code>
<code>import 'package:flutter/material.dart';
main(){
runApp(const MyApp());
}
class MyApp extends StatelessWidget {
const MyApp({Key? key}) : super(key: key);
@override
Widget build(BuildContext context) {
return MaterialApp(
debugShowCheckedModeBanner: false,
home: Scaffold(
appBar: AppBar(
title: const Text("焦点的处理"),
centerTitle: true,
),
body: const MyHomePage(),
),
);
}
}
class MyHomePage extends StatefulWidget {
const MyHomePage({Key? key}) : super(key: key);
@override
State<MyHomePage> createState() => _MyHomePageState();
}
class _MyHomePageState extends State<MyHomePage> {
FocusNode focusNode01 = FocusNode();
FocusNode focusNode02 = FocusNode();
FocusScopeNode? focusScopeNode;
@override
Widget build(BuildContext context) {
return Padding(
padding: const EdgeInsets.all(16.0),
child: Column(
children: [
TextField(
autofocus: true,
focusNode: focusNode01,
decoration: const InputDecoration(
icon: Icon(Icons.person),
labelText: "item1",
),
),
TextField(
focusNode: focusNode02,
decoration: const InputDecoration(
icon: Icon(Icons.person),
labelText: "item2",
),
),
Builder(builder: (ctx) {
return Column(
children: <Widget>[
ElevatedButton(
onPressed: (){
focusScopeNode ??= FocusScope.of(context);
focusScopeNode?.requestFocus(focusNode02);
},
child: const Text("移动焦点")
),
ElevatedButton(
onPressed: (){
//当所有的焦点都失去的时候,键盘会自动隐藏
focusNode01.unfocus();
focusNode02.unfocus();
},
child: const Text("隐藏键盘")
),
],
);
})
],
),
);
}
}</code>
3、监听焦点的变化
获得焦点时focusNode.hasFocus值为true,失去焦点时为false。
<code>import 'package:flutter/material.dart';
main(){
runApp(const MyApp());
}
class MyApp extends StatelessWidget {
const MyApp({Key? key}) : super(key: key);
@override
Widget build(BuildContext context) {
return MaterialApp(
debugShowCheckedModeBanner: false,
home: Scaffold(
appBar: AppBar(
title: const Text("焦点的处理"),
centerTitle: true,
),
body: const MyHomePage(),
),
);
}
}
class MyHomePage extends StatefulWidget {
const MyHomePage({Key? key}) : super(key: key);
@override
State<MyHomePage> createState() => _MyHomePageState();
}
class _MyHomePageState extends State<MyHomePage> {
//1、创建focusNode
FocusNode focusNode = FocusNode();
@override
void initState() {
super.initState();
focusNode.addListener(() {
//3、监听焦点变化
print(focusNode.hasFocus);
});
}
@override
Widget build(BuildContext context) {
return Padding(
padding: const EdgeInsets.all(16.0),
child: Column(
children: [
TextField(
autofocus: true,
focusNode: focusNode,//2、focusNode绑定输入框
decoration: const InputDecoration(
icon: Icon(Icons.person),
labelText: "item1",
),
),
],
),
);
}
}</code>
4、
边框的处理:
<code>TextField(
decoration: InputDecoration(
labelText: "请输入用户名",
prefixIcon: Icon(Icons.person),
// 未获得焦点下划线设为灰色
enabledBorder: UnderlineInputBorder(
borderSide: BorderSide(color: Colors.grey),
),
//获得焦点下划线设为蓝色
focusedBorder: UnderlineInputBorder(
borderSide: BorderSide(color: Colors.blue),
),
),
),</code>
5、更改默认的主题颜色,默认是蓝色。但是现在我想改变为灰色。比如,在不改变主题的时候,属性为label的用户名和密码是蓝色的,现在通过改变主题,让默认颜色改变为灰色。
<code>Padding(
padding: const EdgeInsets.all(16.0),
child: Theme(
data: Theme.of(context).copyWith(
hintColor: Colors.grey[200],//定义下划线颜色为灰色
inputDecorationTheme:const InputDecorationTheme(
//定义label字体样式
labelStyle: TextStyle(color: Colors.grey),
//定义提示文本样式
hintStyle:TextStyle(color: Colors.grey,fontSize: 14)
)
),
child: Column(
children: const [
TextField(
decoration: InputDecoration(
prefixIcon: Icon(Icons.person),
labelText: "用户名",
hintText: "请输入用户名"
),
),
TextField(
decoration: InputDecoration(
prefixIcon: Icon(Icons.lock),
labelText: "密码",
hintText: "请输入密码",
hintStyle: TextStyle(color: Colors.grey, fontSize: 14.0)
),
obscureText: true,
),
],
)
)
);</code>
6、通过组合的方式,利用Container重新绘画下划线
<code>Container(
decoration: const BoxDecoration(
// 下滑线浅灰色,宽度1像素
border: Border(bottom: BorderSide(color: Colors.grey,width: 1))
),
child: const TextField(
decoration: InputDecoration(
prefixIcon: Icon(Icons.email),
labelText: "Email",
hintText: "请输入邮箱",
//删除原来的下划线
border: InputBorder.none
),
),
)</code>


文章评论